
How I Edit my Colour Images with Lightroom

How I Edit my Colour Images with Lightroom: A few weeks back I posted my Monochrome RAW Lightroom Editing workflow. It was a popular piece on this site as well as over on my YouTube Chanel.
One of the questions that arose from that, was "How about colour editing?" - and so today I'm pushing out How I Edit my Colour Images with Lightroom.
As with the monochrome edit, I fully appreciate this is as subjective as photography itself. Even if the finished look isn't to your taste, I hope you find something of use in the workflow.
Remember, these are RAW files being edited in Lightroom. I do use Alien Skin Exposure a lot too and will be showing more of that workflow in the coming weeks.
Whereas the monochrome edit was a little more detailed, the colour one is much more straightforward.
The key thing in the colour edit is the Tone Curve.
Take a look at the video below to get an understanding of how I do the colour RAW edits of my Fujifilm files.
Skip to 3:01 if you want to get straight to the workflow.
Note that I don't use the Adobe Camera profiles. I don't find any of the Adobe versions of the film simulations come close enough to what I want to achieve with my RAW files.
This doesn't mean the Adobe camera profiles are bad of course. In fact, the complete opposite - they are great as a starting point, but for this particular style of edit, I prefer to use the Tone Curve plus basic editing techniques to achieve these goals.
The objective is to go from this RAW Image:

How I Edit my Colour Images with Lightroom

How I Edit my Colour Images with Lightroom

How I Edit my Colour Images with Lightroom

How I Edit my Colour Images with Lightroom
The objective is to go from this RAW Image:To this processed image:And this underexposed RAW Image:To this processed image:
Colour Edit Step One - Basic Adjustments and White Balance

This is pretty straightforward and acts as a starting point. You'll see the clarity has been notched up slightly and I've adjusted the Shadows and Highlights and Blacks and Whites accordingly.The exposure, of course, will be dependant on the image and will never be the same for each picture.
Colour Edit Step Two - Adjusting the RGB Channels in the Tone Curve


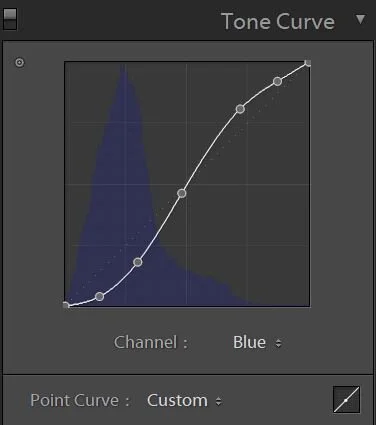
An essential part of this How I Edit my Colour Images with Lightroom workflow is the individual colour channels in the Tone Curve.
You'll see each of the Red, Green and Blue channels are very similar.
Again, these are the starting points and I'll list the values below. Your mileage may vary of course and these are tweaked from an old VSC profile that I used to use many moons ago.
Red Channel: 0.015.529.549.571.5100[
Green Channel: 0.014.229.948.57186100
Blue Channel: 0.014.229.847.871.687.1100
Colour Edit Step Three - Adjusting the Hue, Saturation and Luminance

This is pretty straightforward also, and again, depends entirely on your personal preference but it's How I Edit my Colour Images with Lightroom. These are my base values that get applied to all RAW files that I'm intending to finish as colour.In most cases, I don't adjust these further in the process and so are part of the import preset.
As with most things in Lightroom, if you find yourself repeating something, there is usually a way of automating it via a preset.
Colour Edit Step Four - Camera Calibration Panel

As I mentioned earlier, if I'm shooting RAW and processing for colour, I typically avoid the Adobe Camera Profiles for the Fujifilm cameras.What I do embrace though, is the very powerful colour tweaking settings in this panel.I tried to think of a way of explaining how this is different to the tweaks in the HSL panel, but I found this great article on PetaPixel that does it for me.
"Changing these values differs from changing the values in the HSL panel because they affect the overall definition of red, green, or blue. Changing blues in the HSL panel will target areas of the image that appear blue, whereas changing blues in the Camera Calibration panel will affect all pixels that contain blue in their mix."
This section is where things get a little more tricky as the camera calibration panel is really designed to tweak against individual cameras. These settings can be slightly different for each Fujifilm Camera and may well be substantially different for a Canon or Nikon camera.The nuances of this are multi, but ultimately these base settings seem to work well for all my Fujifilm cameras. In the video showing How I Edit my Colour Images with Lightroom, I edit an X-Pro2 image and a GFX50S image.I do have slight variants of these settings for my older X-Trans 1 cameras (X100, X-Pro1) which I still occasionally shoot with.If you use something like VSCO you will see that they use a defined profile for each camera they support, which takes this panel to the next level and this is something I've been toying with for a set of unique presets.
How I Edit my Colour Images with Lightroom - Summary
I hope you found How I Edit my Colour Images with Lightroom useful. As I said several times through the video, this is just my style of editing colour files from RAW and it's totally subjectiveAny questions, please feel free to comment below or on the YouTube channel (and if you can subscribe there, I’d appreciate it too).
And Finally….. Are you a Wedding or Street Photographer?
I’ve spent the last year or so planning the first ever X-Weddings Conference. It will be in Bath, England on the 12th & 13th of June.We have a top lineup of speakers and you can learn more by heading over to https://www.x-weddings.co.uk
Happy Snapping – Kevin (in my Kitchen at home listening to Ill Communication by the Beastie Boys))